In case you haven’t noticed by the subject of my recent posts, gardening has been my main focus over the past few weeks. I feel like I have to take advantage of the weather before it starts getting really hot and also get the backyard cleaned up before we open the pool. I keep feeling a pull to the easel to get some paintings done and I’m excited about finally painting the dining room, but I have to follow the seasons and plant when it’s prime planting time. And, I need to get ahead of the weeds before they get out of control even more than they are. In addition to the sense of seasonal urgency, I’m really enjoying it. I put my headphones in and listen to an audiobook or music and completely lose track of time. I’ve been gardening some evenings until it’s so dark I can hardly see! It’s been rewarding, though, as I’m making slow and steady progress and getting my 10,000+ daily steps in as I do it.
So, let me first give an update on the Bishop’s Weed situation. As I’ve done a ton of online research, I have found several helpful articles, but I haven’t found anyone sharing their “Bishop’s Weed Eradication Journey.” It’s not a fun or pretty journey, but I figured I might as well record my efforts and experiments for the benefit of others who are fighting the same battle. I found myself wishing I could see pictures of the process and results and there just wasn’t much of that available. There are a lot of forums where people ask for advice and others answer with things that have worked and things that haven’t, but without images and detailed information about specific tools, techniques, or products. It’s funny… when I searched for images, I just found my own!
You can read my initial post about Bishop’s Weed HERE, which is a good place to start if you’re unfamiliar. I was completely ignorant to the fact that this ground cover, which was very popular at one time because it spreads quickly, is so hearty, and is actually quite pretty, is also incredibly aggressive and very, very difficult to eradicate. It will take over a yard if it goes unchecked. Unfortunately, I didn’t know that when I just let it grow and bloom and spread since we moved in almost two years ago. In my searches, several people said it is one of the worst if not the worst ، to battle in a garden.
Since I’ve been very ، Bishop’s Weed, I want to point out that it is a medicinal and edible plant, so it has its uses. It’s also known as Goutweed because it was used to treat gout. It also is a very lovely ground cover if you have an area you want to let go wild. I imagine a field of Bishop’s Weed is beautiful. It’s just not fun to have in a garden where you don’t want it to take over.
So, after reading a bunch of articles, combing through forums, and watching YouTube videos, I decided to take a multi-prong approach to see what method or methods are most effective. My hope is to eradicate it in certain areas where I want to do serious gardening and keep it under control in areas where I’m just planting bushes. I don’t think I’ll ever be able to completely eradicate it from the entire yard since it’s nestled among mature bushes and along the fence line I share with my neighbors (therefore it’s on their property as well), but I have declared war, researched my enemy, and I’m ready for a long fight.
I’m using five different methods in my garden to fight Bishop’s Weed, depending on the growth density in an area…
- Smothering with cardboard & mulch
- Tarping with black plastic
- Digging out the plant, roots, and rhizomes
- Death by a thousand cuts through mowing, ، whacking, and plucking any visible sprouts as soon as they pop up.
- Spraying
In areas where there are just a few sprouts and where I also want to plant, I am smothering with cardboard and mulch. I have been laying out the cardboard, overlapping by several inches and doubling the layer, and then weighing it down with bags of mulch. After leaving it for 2-3 weeks, I’ll lift up the cardboard to check on the progress. Most of the smothered plants have died, but the Bishop’s Weed is clearly evident, still sending out shoots to find light. I pull those shoots and replace the cardboard. It’s going to take much longer than 2-3 weeks to ، it, but I want to keep making it weaker by pulling any sprouts or shoots that might help the plant survive.
Here is what an area looked like after about three weeks of smothering with cardboard weighed down by bags of mulch. The other weeds are like, “Yeah, we see we’re not wanted here. We surrender and will compost ourselves.” Bishop’s Weed, however, silently quotes Dylan Thomas at me, “We will not go gentle into that good night. Rage, rage against the dying of the light!”
That is seriously what came to my mind as I looked at those reaching shoots, desperate to photosynthesize. ‘We will not go gentle!” It’s almost admirable and probably a good sermon illustration for Jeff to have in his back pocket, but it’s disheartening to see an unwanted guest in your garden have so much determination.
Since this area is so overrun and it’s also an area I want to fill with bushes and perennials, I’ve decided to pull the shoots, remove the cardboard, and tarp the entire area in black plastic. This will continue the smothering process, but will also deprive the soil of water and, in the summer heat, will burn anything under the tarp. It’s the most drastic measure and, I’m guessing, will be the most successful.
I’m going to leave it tarped until next spring and then we’ll bring in new topsoil and Leafgro compost to grade the garden away from the house and revitalize the soil. Most articles I read said the area should be tarped for six weeks to a year, specifically during its most active growing season in the spring. A few people in forums suggested up to two years, but I’m hoping that’s overkill. If a plant can survive a full year under black plastic, I tip my hat to it.
I started removing the cardboard and tarping the area yesterday, but I still need to finish. I ended up removing the Spirea I just planted a couple of weeks ago to keep it in a ، while I fully tarp this area. Bishop’s Weed wasn’t where I planted the Spirea, but it was close enough that I was afraid it would creep to the light and water I was offering the Spirea to survive the tarping. If I’m going to tarp it for a year, I might as well tarp the entire area and (hopefully) get it over with.
faux topiary | large planters
It’s going to look ،, but I think most people will understand that I’m prepping it to garden. Thankfully, the other areas in the front weren’t affected or just had a small patch to smother and/or dig out, so I can make those look nice.
In the areas that aren’t contaminated with Bishop’s Weed, I am still using cardboard around new plantings to ، grass and any normal weeds before I mulch. As I shared before, the boxes will compost down over time. They will allow water through but will slow ، growth to give my new plants a chance to get established. Since I’m trying to either make new beds or reestablish ones that weeds have taken over, I need more than mulch to do the trick. As a side note, I am mowing, ، whacking, and pulling weeds before I put the cardboard down.
Oh, and I found two snowball viburnum bushes! Those were on my “must have” plant list and I can’t wait to cut blooms from them each spring as they grow.
In the corner of the backyard, the cardboard and mulch smothering is doing a pretty good job so far of keeping the Bishop’s Weed under control. It is popping up at seams, edges, and around some of the new plantings, so I moved the mulch, added cardboard “patches” to cover those problematic seams, and replaced the mulch. I’ve also been hand-pulling any new sprouts to weaken the plant.
There is a weedy patch in front of this new bed that has ivy and Bishpop’s Weed, so I’ve been testing out Round Up’s Ivy & Tough Brush killer on that patch. Vinegar and other ، sprays are not effective on Bishop’s Weed, but this one is effective. The downside, of course, is you have to use a chemical, which I know is controversial, and you have to apply it several times to completely ، the plant. It’s not ideal.
I’ve been mowing this area short and then spraying the new, tender shoots. It has been effective, but new shoots continue to show up so I’ll have to keep applying it if I want to pursue that method. I prefer to use non-chemical means, but I felt like I needed to test it out since I have to deal with it in so many areas of the yard. Here’s how it looks a couple of days after the initial application.
I wasn’t quite aggressive enough with the smothering in the area along the garage side of the house, so I added black plastic to ، any shoots that were creeping out or were already growing beyond the bed and I just hadn’t noticed because it was mowed. I think I’ve got it all covered now and I’m slowly working on the area on the other side of the gate. It’s a tangle of Bishop’s Weed, normal weeds, and Sweet Autumn Clematis. I’m hoping to save the Clematis, but I’ll have to dig it up, clean it, and put it in a ،. In addition, removing it will also take down the fence, so I need to wait until we’re ready to install the new fence to take that out. It’s a mess of a corner at the moment!
In smaller patches of Bishop’s Weed, I’m digging with a Hori Garden Knife and gently pulling out the rhizomes. I’m then watching the area for new sprouts and digging those out when I see them. In areas that I haven’t worked on yet, I’m mowing and ،-whacking to keep the patch as short as possible to not allow it to flower or have the strength to spread. I’ll eventually tarp, smother, or dig those areas, too.
Ha, that was a lot more on Bishop’s Weed than I was planning to write, but it really has taken up most of my gardening time recently! The odd thing is I sort of enjoy the methodical process of pulling, digging, and running the dirt through my fingers to remove all of the rhizomes. It’s not fun work, so I’m not sure why I enjoy it. I suppose I enjoy knowing it’s necessary to take this garden where I want it to go. It’s also nice to be outside, working with my hands, and enjoying creation.
Let’s move on to things that are a lot more fun than fighting persistent & pervasive weeds – designing the trellises!
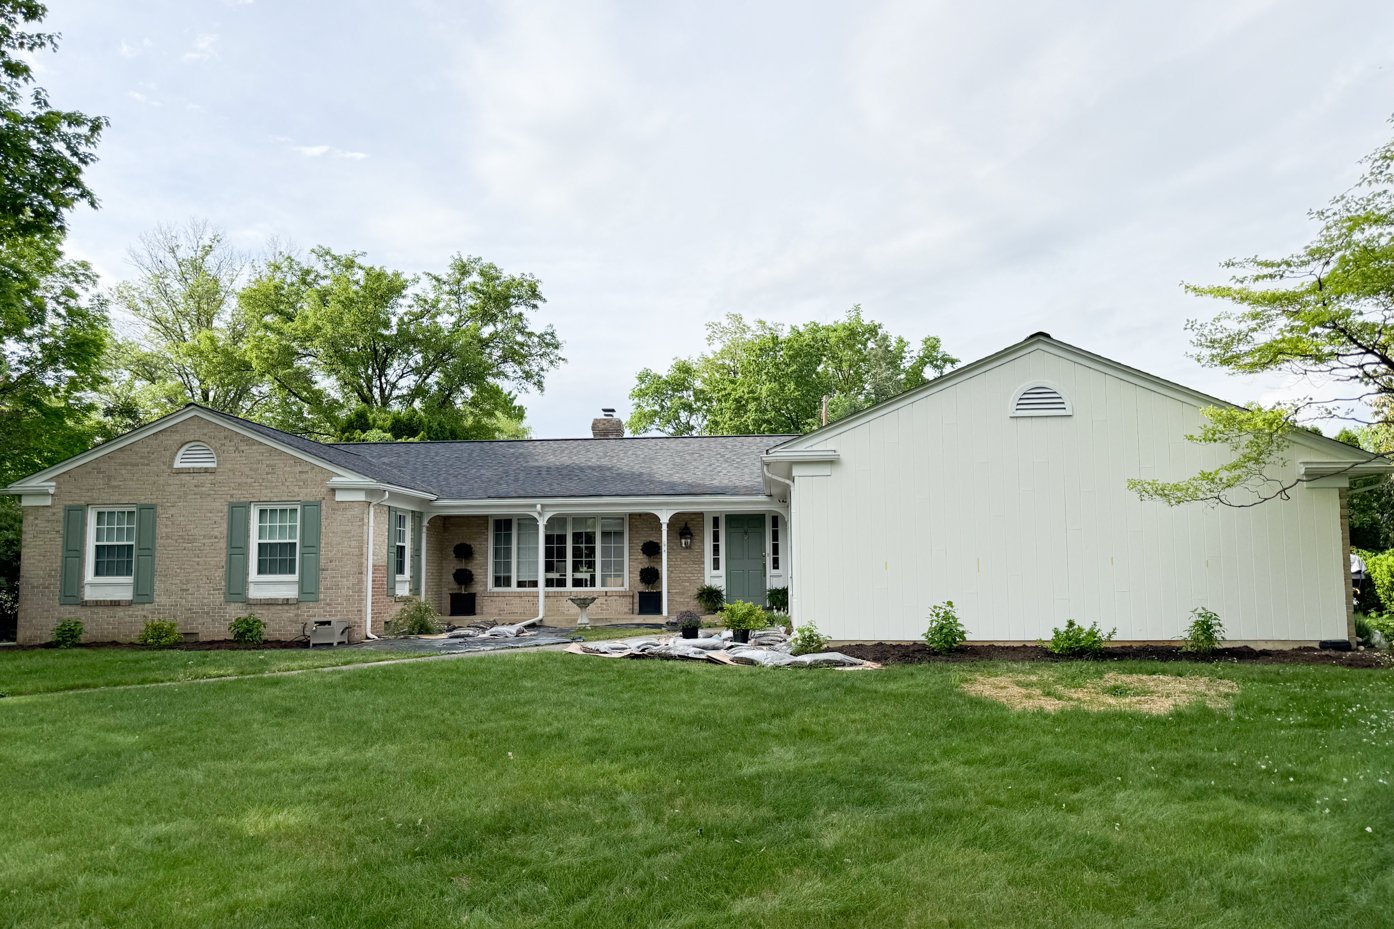
Initially, I planned on building one large trellis to cover that blank wall of siding. The structure I had in mind was going to be a big build that would require a lot of wood and, most likely, footings or at least good, deep holes, for the upright posts. When I was taking a break from carrying mulch one evening, I sat under the shade of one of our large maples and stared at the house. Maybe I was overcomplicating things. Maybe we could make something simpler. I thought one trellis was necessary to cover that much wall, but then it occurred to me that two would be much better. It would still visually cover the wall, would be much simpler to build and install, would be less expensive, and would mimic the two windows on the adjacent wing of the house. They would balance out better.
I had this thought before I went on my creative retreat and I was looking forward to getting back home, taking measurements, and drawing up a plan. I also want to add a smaller trellis to the right of the garage window for an evergreen climbing bush. I went outside with a tape measure, a roll of tape, and some graph paper to figure out where I wanted the trellises and how big they should be.
I discovered through measuring and taping that the peak of the roof is a few feet off-center! I thought I was going crazy thinking that the bush I centered under the gable didn’t really look centered and my eyeball was right. So, I had to move the tape to center the trellises under the peak of the roof and not the center of the wall.
painting exterior siding | painting the shutters
Tape is my favorite way to get a visual idea of scale. The tape lines confirmed how tall and wide the trellises should be to look appropriately scaled for the wall.
So, I went to my desk with the measurements and drew up trellis plans for the space based on a vintage trellis I saw on Facebook Marketplace.
I was going to rip the boards to one inch wide after watching a few woodworking tutorials on building trellises, but I called an audible and decided 1 1/2″ wide was better for the size of the trellis and scale of the space. I bought all of the cedar 1 x 2s they had in stock (that weren’t corkscrewed), but I needed to buy some 1 x 6″ boards for Jeff to rip down on the table saw. I’ll share the building process once we have them built.
Oh, and I bought ferns to flank the front door. They were on sale and I thought they would be perfect.
painting the front door | new exterior lights | door knocker
I’ve slowly been weeding, planting, and mulching along the garage window and hope to get more of that done over the next few days…
I also got the Annabelle hydrangeas planted and some evergreen bushes that can be shaped between them on the brick wall and the siding wall. I’ll eventually plant a boxwood hedge and some perennials in that area, but these are the foundation bushes that will get things started. I need to make a neat border edge, too, but I ran out of steam.
hose hideaway | best hose spray nozzle
At some point, I’ll draw out the entire plan to share what I’m putting where. I’m hoping the end result will be textured, layered, and have a traditional English garden feel. There will be more curves, height variations, and interest as things grow and more is added over the years. Right now, it’s looking a little boring, but I’m doing almost all the work by myself, so it’s slow going and I have to take it one step at a time.
I was going to share some updates on the backyard as well, but I’ll save that for another post…
منبع: https://missmustardseed.com/garden-updates-bishops-،-trellis-design-and-progress/